If you follow me on instagram, you saw that we spent our morning this morning getting our 2020 family Easter photo!

That being said, with everything going on in the world right now, getting a family Easter photo really doesn’t matter. I get that. But, I love this time of year. I love cute spring clothes. I love getting a family Easter photo every year with our family… and I didn’t want to miss this year, even given the state of the world. So, yes… family photos and Easter outfits don’t really matter. But, what does matter is making memories with people that we love… and doing things that bring us joy. And, this brings me joy So, while we cannot control what is out of our control, we can control adding things that bring us joy to our days and to our families.
So… if you want to try a self timer photo for yourself, I’ve outlined a few easy steps to get the best image. (And, by “best image,” I mean something decent. Maybe not perfect. Expectations are everything. And, I recommend having low ones for this little project. Then you’ll be pleasantly surprised with the outcome, hopefully)!
6 Steps to a good decent family photo at home:
Pick a spot:
First things first, decide where you want to take your photo. We were supposed to have rainy weather this morning, so I fully expected to have to choose an indoor spot. But, the rain came later than expected, and we got some good sunlight in the morning. So, we pivoted to take our pic by the front door. That being said, wherever you choose, you want LOTS of natural light, and a clear, crisp, uncluttered background, if possible.
Test your lighting:
Once you’ve picked a spot, or two, test the lighting. Take a few pictures either of the spot alone. Or, even better, a test shot or two with you in it to see how the lighting looks. You can always lighten up a photo (as I talked about in my mobile photo editing post), but you still want lots of natural light for a good image. Here are a few basic test shots I took, below:

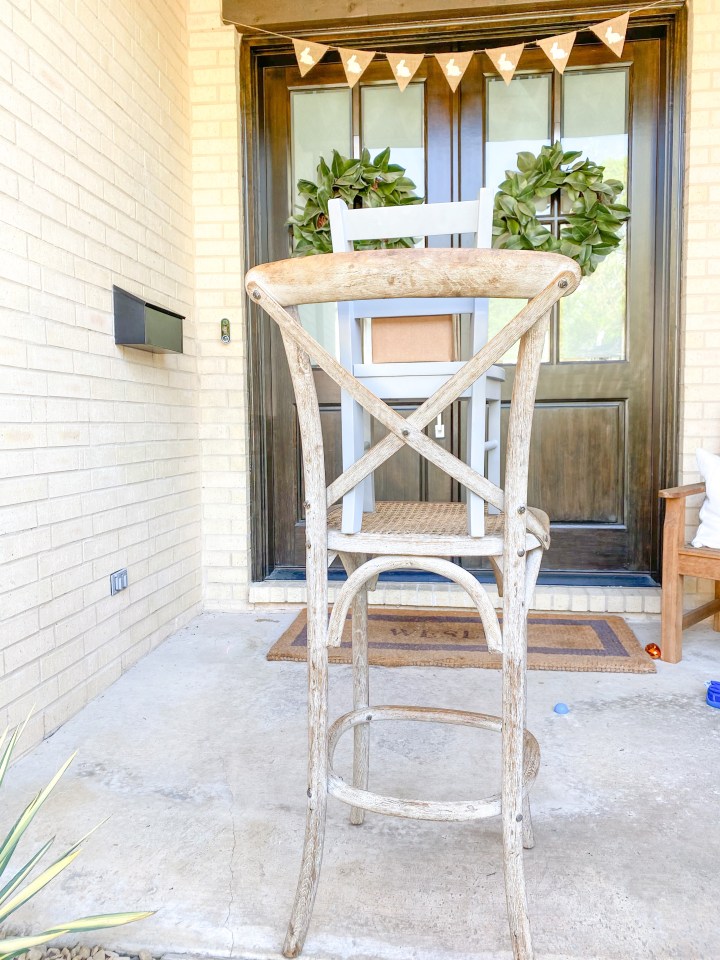
Set up you phone
The next step is to set up your phone! Everyone thinks you need some sort of fancy tripod and all of this technology to get a professional looking self timer photo. But, honestly, since we’re all at home anyway, all you need is something tall enough to set your phone up on to be high enough to take an eye level photo. Here’s the set up I came up with today:

While we’re on the subject of setting up your phone, there is a built in self timer option on the iphone now. To get there, open up your camera on the phone, then flip the screen around so you’re looking at yourself like you’re about to take a selfie. There’s a little arrow pointing up at the top of the screen when you’re in selfie mode. Tap that. Then, you will see a few other options come up below your face. The second from the left should look like a clock. Tap on that. From there, you have 3 options: “Timer off,” “3 s” and “10s.” That’s for 3 seconds and 10 seconds respectively. I recommend clicking on 10s, to give yourself a 10 second countdown. Once you’ve hit that, you push the big white button at the bottom, like you would if you were normally taking a pic… but the 10 second countdown will begin. And, good news, it’s big and bold in the middle of the screen. You can’t miss it! We like to count down out loud, so everyone knows when to smile.
Take a million shots
Here’s the fun part! Try as many as you can until everyone gets worn out. For us, today, we only got 9. about 9. But, 9 is better than 1 to choose from.
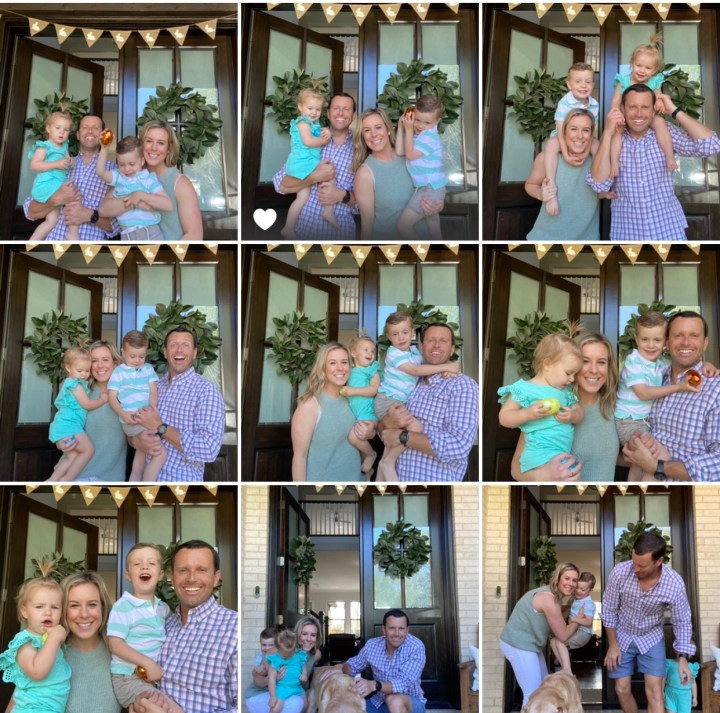
I don’t even look at the pics as we’re taking them. Just push the button, pose, smile. And do it again and again.
That being said, my family is VERY used to doing self time photos… but if this is your first time getting everyone together for one of these, maybe look at the first few to see how everyone looks and reposition if you need to. The beauty is, you can do them again and again.
Get close and have fun
One thing I’ve learned form lots of family photos is that if everyone is really close to each other, touching lots, and having fun, the pics turn out better. So don’t be afraid to lean in, laugh, hug, try a new pose, and go again. Have fun with it. But, I promise you, you’ll like the photos better where you’re all squishing in, touching each other, and looking like you love each other.
And, finally, once you have a couple of good shots: Edit them!
I have a whole blog post on mobile photo editing. Seriously, nothing fancy here – just a few clicks to lighten up a photo, or blur a photo background.
Editing makes a world of difference, though. See my before and after below:

The pic on the right is lightened a touch, the background is blurred, and it’s cropped to a square.
And, that’s it, my friends. Here are our final products for our Easter Family photo, 2020.